How to Draw Dark Sonic Easy
When it comes to video game characters, they seem to come in tiers of popularity and endurance.
Some characters have many fans, but others are destined to become icons that pretty much anyone would recognize.
Sonic the Hedgehog is one of those iconic characters and has been having high-speed adventures since his first appearance in 1991.
If you count yourself as one of his legions of fans, then maybe you've wanted to learn how to draw him to celebrate your fandom.
We have created this step-by-step guide on how to draw Sonic in just 9 easy steps to make the process as fast as the speedy hedgehog himself!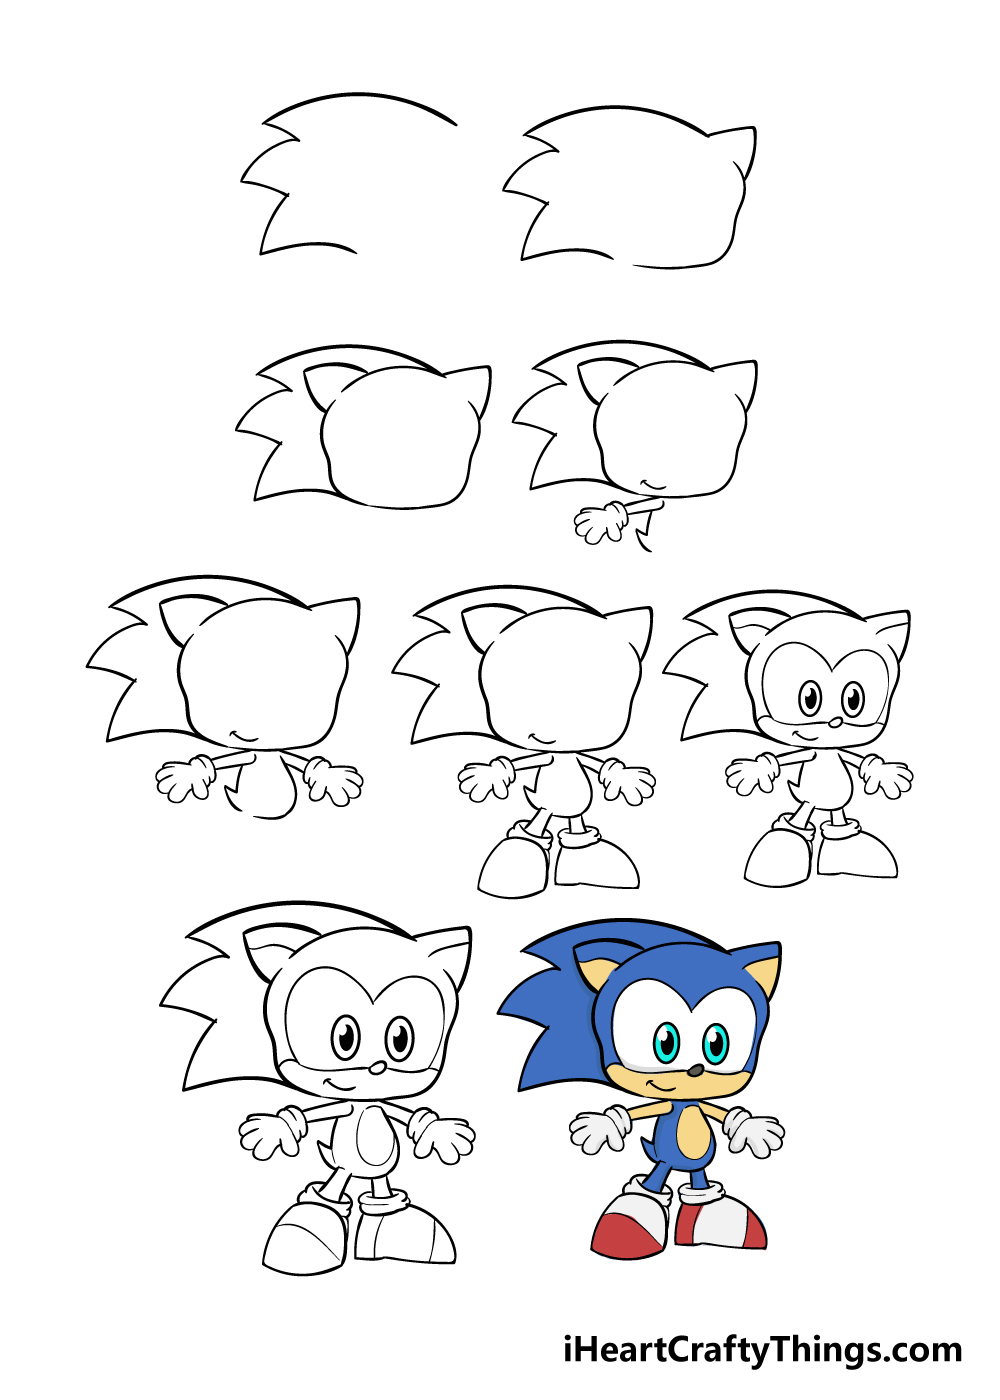
What's in this Blog Post
- How to Draw Sonic – Let's get Started!
- Step 1
- Step 2 – Next, you can start to draw his head
- Step 3 – It's time to add in Sonic's other ear and the rest of his head
- Step 4 – Draw in Sonic's first arm
- Step 5 – Give Sonic a stomach and his other arm
- Step 6 – Let's add in some legs for Sonic
- Step 7 – Now, we can draw in Sonic's face
- Step 8 – Then, we will add in some final details
- Step 9 – Now finish it off with some color
- Your Sonic Drawing is Complete!
How to Draw Sonic – Let's get Started!
Step 1
Sonic has some pretty distinctive characteristics to his design, and we will make sure to include all of them! To start with, we will begin with one of those characteristics; his spiky back!
To start with this, you can draw a horizontal curved line for the top of the spikes. Using a series of more curved lines that end in points, we will be adding in three points to his spikes.
To help you visualize where everything will be going, you could draw in a circle using a light pencil to show where his head will be in relation to his spikes.
Step 2 – Next, you can start to draw his head
For the next part of your Sonic drawing, we will be adding at the beginning of his head outline. At the end of the curved line you drew, simply add in a triangular line to form his ear.
Using the reference picture as a guide, you can then draw in a curved line to form the front of his head.
This part could use some practice, so it might be a good idea to draw it in pencil first, and then go over it in pen once you're happy with it.
Step 3 – It's time to add in Sonic's other ear and the rest of his head
In this next step of our guide on how to draw Sonic, we will be showing you how to draw the rest of his head.
Using the ear you drew in step 2, carefully add in a curved line for the top of his head.
Once you have that drawn in, you can add in another pointy ear like the other one, and then mirror the side of his face to look like the other side.
With that done, your Sonic head is done and you can move on to the next step!
Step 4 – Draw in Sonic's first arm
Before you draw in the first arm of your Sonic drawing, be sure to add a curved line to form his smiling mouth inside his head!
The reference image will guide you on where to place that. His arm will then start to extend with a straight line directly from his head.
His gloved hand is then made up from some more curved lines, and you can follow the picture closely to replicate the look of the hand.
Once you're happy with his arm, carefully draw in a line going down that has a sharp point for his tail.
Step 5 – Give Sonic a stomach and his other arm
Now that you've drawn in one hand, you should have no problem adding the other one!
His other arm will be a mirror image of the first one you draw, so it should be much easier to add in, especially with the reference picture to help you.
Once the other arm is drawn, you can use a nice curved line to give Sonic a tummy. This line should almost touch the other side of his body, but be sure to leave a space for his leg in the next step.
Step 6 – Let's add in some legs for Sonic
Sonic wouldn't be Sonic without his speedy legs, so it's time to draw some in for him in your Sonic drawing!
Using some short, straighter lines, you can add in the beginning of his legs. One of them will go in the space you left earlier.
His socks are then made up of two squat shapes, and then his shows are big and rounded.
If you use the reference picture, I'm sure you'll do a great job of drawing in his legs!
Step 7 – Now, we can draw in Sonic's face
For the next step in our guide on how to draw Sonic, we will be giving the speedy hero a face.
You can give him his eyes by using two long ovals and then add in two smaller solid black ones inside them.
He then has his eyes surrounded by a large, rounded shape that you can see in the picture. Carefully draw that in, and then add in a round nose for him.
Finally, you can add in some lines in his ears to give them some depth.
Step 8 – Then, we will add in some final details
Your Sonic drawing is almost done, and just needs a few final touches!
You can draw in some simple lines on areas such as his belly, hands and feet as you can see in the reference picture. With these details added, there's only one step left to go.
Step 9 – Now finish it off with some color
With that, you have managed to learn how to draw Sonic! There's one more step though, and it's a fun one!
Sonic needs some color now, so you can have a great time using your favorite art tools to color in everyone's favorite hedgehog.
Sonic has a distinctive color set, and we have shown in our picture what he typically looks like. Will you stick with Sonic's regular colors or will you use some of your favorite colors to fill him in?
You can also have a great time trying out some fun art mediums such as paints, watercolors or colored pens for some amazing color variations!
Which colors and mediums will you use to finish off your incredible Sonic drawing?
Your Sonic Drawing is Complete!
We really hope that you had a great time using this guide to learn how to draw Sonic!
We wanted to make it easy and fun for you to learn to draw the blue blur himself, and now that you have done it you could keep drawing him and maybe change his position, expression and background!
The sky is the limit, and you should let your creativity run wild! We can't wait to see what drawing variations, colors and mediums you use to complete your drawing.
We have many more awesome drawing guides like this one coming out all the time, so be sure to check out our page frequently so that the drawing fun never has to end!
Lastly, once you have finished your Sonic drawing, we would love it if you would share it to our Facebook and Pinterest pages!
We love to see how creative you can be, and we're looking forward to seeing your incredible Sonic drawings!
Source: https://iheartcraftythings.com/sonic-drawing.html
0 Response to "How to Draw Dark Sonic Easy"
Post a Comment